How can I assign time-bound tasks to my team?
How to track the time spent by my team on their tasks?
How to make sure if the task is completed or not?
How to make my team accountable for how they spend their time?
If these are some of the questions you are struggling with, CV TimeLogger is here to your rescue. It’s an Enterprise-Grade application designed to help you(Manager, Supervisor, Company Owner) to manage tasks and the time spent by your team/employees on each task.
In just a few steps you can start managing your team and their tasks like a PRO.
- Create a task with a start and end date
- Assign the task to a team member
- The team member can lock their hours for all the tasks assigned to them in the TimeLogger Component
- They can mark the task as completed once it is done.
- Drag and Drop Lighting component to track time Entries.
- CV Timelogger component can be used on any Lighting record page and home page.
- Out-of-box reports and Dashboard for better analytics. Easy to configure the application.
- Intuitive interface to create tasks and log hours View all assigned tasks for any particular date with a calendar option.
- Pre-defined fields to capture Rate/Hr and calculate Amount based on logged hours.
- Enterprise-Grade application.
Installation Steps
- Please visit the Download tab from your CV App Account.
- Select your environment sandbox or production and click on the installation link accordingly to install the app in the selected environment.
We recommend installing the app in the sandbox first and then install in production if everything looks fine.
- Please enter login details of your salesforce administrator if you are presented with the login screen.
- Once you are presented with the installation screen, you are required to select which of your users should be granted access to the CV TimeLogger app including all its components.
- Most customers should select the middle option “Install for All Users”, which will ensure that all users have the proper permissions should they be assigned a license in the next step.
Click the Checkbox as shown to Acknowledge your installation.
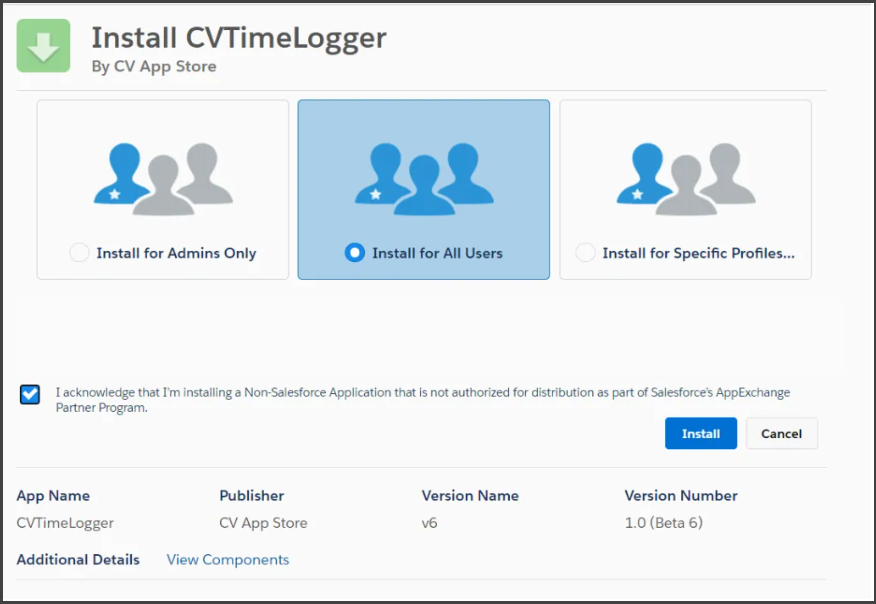
Once you make your selection, click the Install button.
Once the installation is complete, click the Done button to return to your Salesforce org. You may see a message stating that the installation is taking a long time to complete. In this case, you will receive an email once the installation finishes.
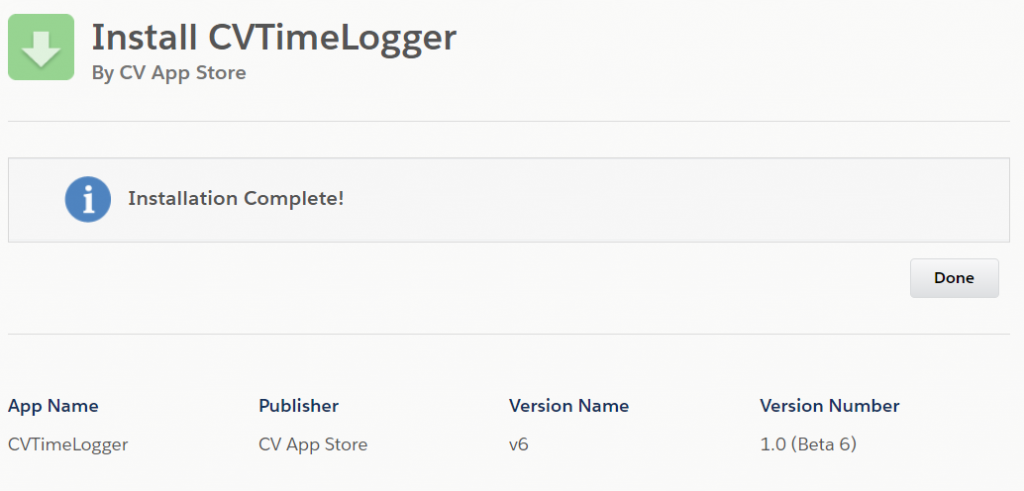
Now CV TimeLogger is Installed in your System.
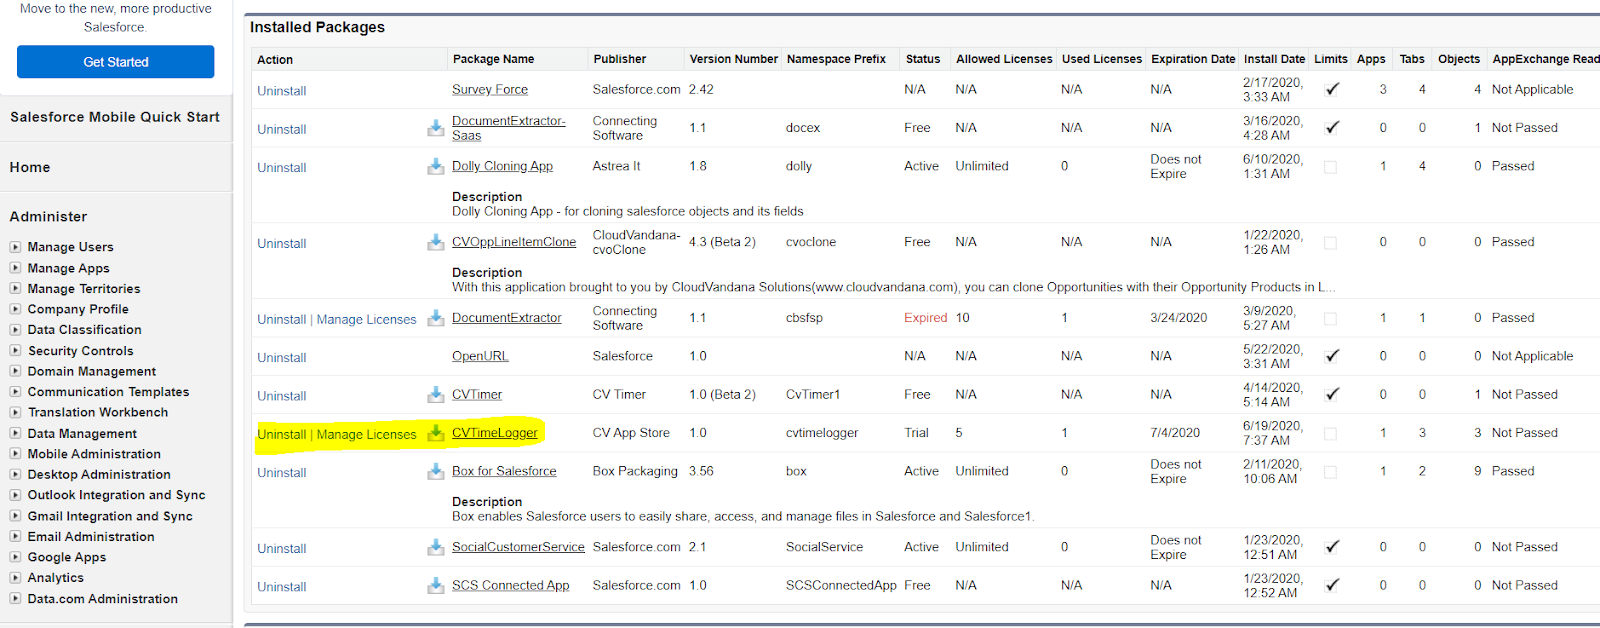
You can verify the same in the installed packages. From Setup, Search Installed Package and Click “Installed Packages” to view.

Configuration Steps
Manage Licenses
By default application license will be assigned to the system administrator who installed the application.
You can assign the licenses to the users as per the allowed licenses depending on the subscription.
Note: You can can contact us at “support@cvapp.store” in case you see any discrepancy
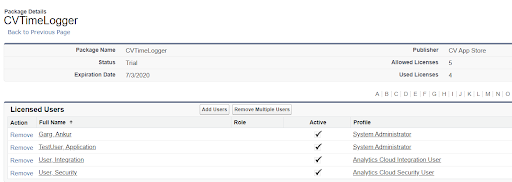
From Setup, Search Installed Package and Click “Installed Packages”
Click on Manage Licenses link for CV TimeLogger.
On Next Screen Click on Add Users or if you need to remove any existing user then click on Remove Action.
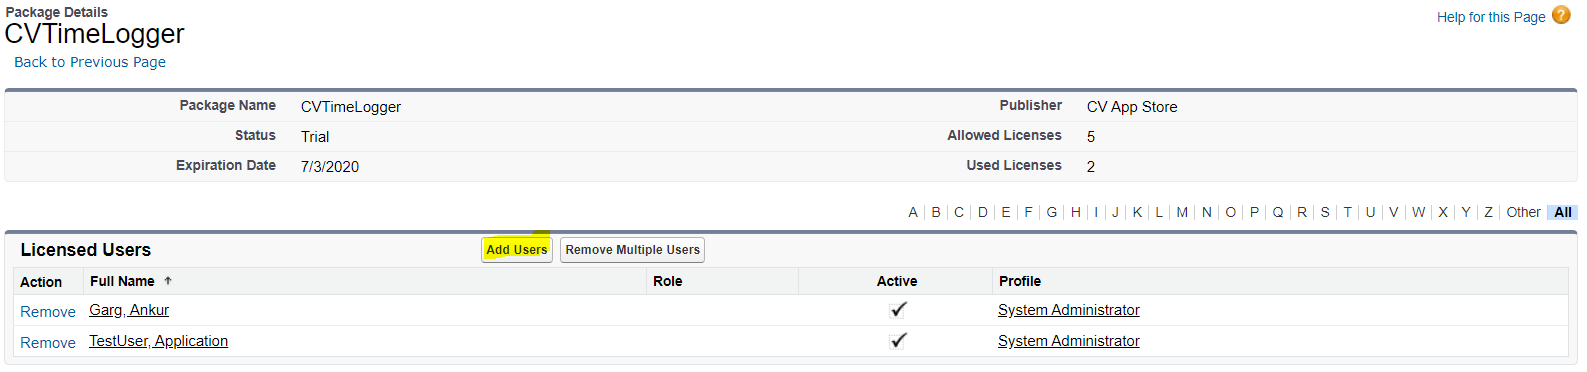
Select the users for whom you want to give access to the app from the list of Available Users
Click on the Add button.
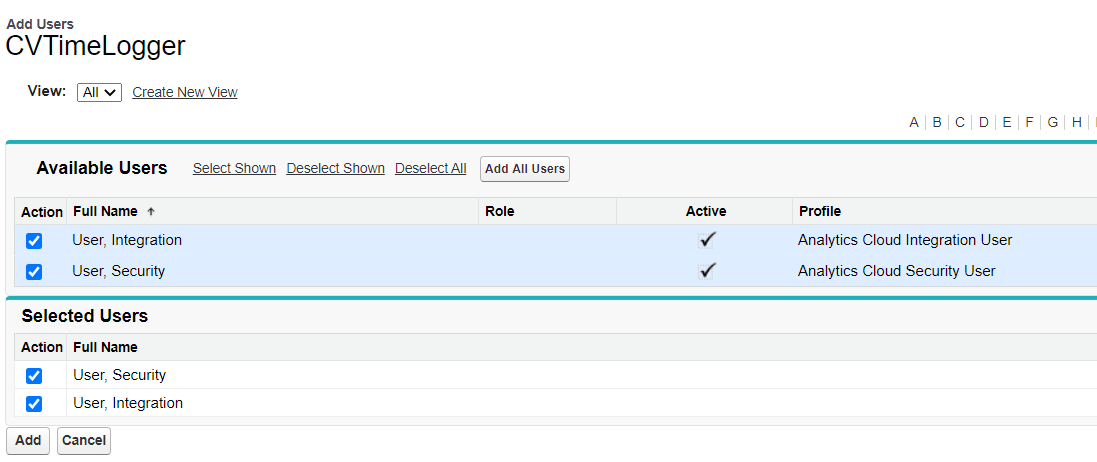
On Next screen you will see the list of users who can access this App.
Enable My Domain – Pre-Requisite
My Domain is a Salesforce feature that lets you highlight your brand, makes your org more secure, and allows you to take advantage of some new features of Salesforce like Lightning Pages, the Lightning App builder and, what we are interested in most, Lightning Components.
The easiest way to see if you have My Domains enabled is to log into Salesforce and look at the address bar. If you see something like https://yourcompany.my.salesforce.com, then you are all set and can skip to the next step. However, if you see something like https://na31.salesforce.com, you do not currently have My Domain enabled and need to take a few extra steps first.
For more details, watch a demo of My Domain or review the My Domain module on Trailhead.
Add CV TimeLogger Interface to Lightning Page
CV TimeLogger interface can be added to any Lightning record page, the home page, or the app page.
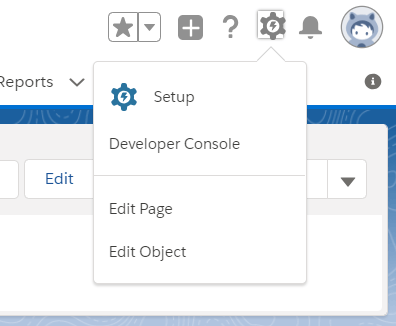
From the Home tab or any record detail page, click the gear icon at the top right corner, select Edit Page to open the Lightning App Builder.

To Edit any other Page, from setup, enter App Builder in the quick find search box then click on Lightning App Builder.
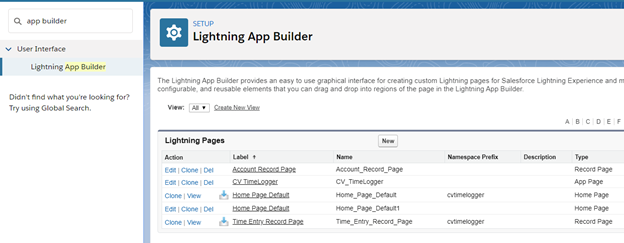
Enter cvTimeLogger on the search component from the left.

Drag and Drop the CVTimeLogger component on your page layout at the desired section.
Click Save, and then click Activate.
You have a few options for activating a record page.
- Make the page the org default for the object.
- Make the page the default object record page for specific Lightning apps.
- Assign the page to a combination of Lightning apps, record types, and profiles.
- Assign the page to a form factor, such as a desktop or phone.
Give permission of objects to the profile
From Setup Enter Profiles in the Quick Find box, then select Profiles
Enhanced profile user interface—In the Find Setting.. box, enter the name of the object and select it from the list. Click Edit, then scroll to the Object Permissions section.
Original profile user interface—Click Edit, then scroll to the Standard Object Permissions, Custom Object Permissions, or External Object Permissions section.
Specify the object permissions for CV Exception Records(Check Read and Create Checkbox Only), CV tasks and CV Time Entries.
Click Save.
If you are unfamiliar which access is suitable then visit Object Permission from Salesforce Help and Training.

For any assistance with this process, send an email to “apps@cloudvandana.com” and we can help!
With CV TimeLogger easy to use Interface you can view and update hours throughout the entire platform. Create CV Tasks and Assign them to your team.
Create CV Task
If you are a Manager, Supervisor or need to assign a CV task to your colleague or yourself. You can use CV TimeLogger Interface to create a CV task easily and quickly.
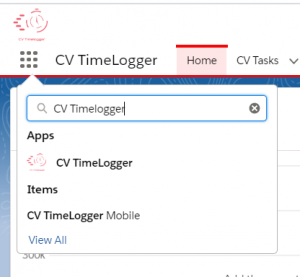
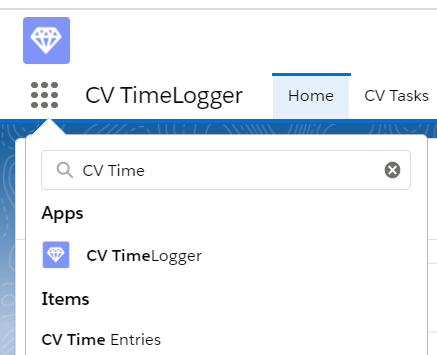
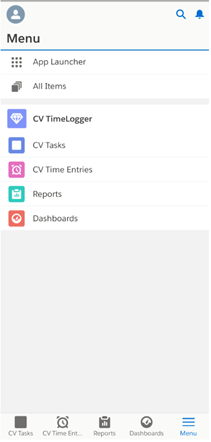
Access CV TimeLogger App by click on app launcher and search for CV TimeLogger app.
Click on CV TimeLogger to open the app.
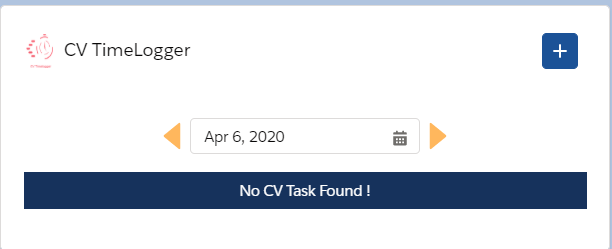
You will see the Time Tracking component on the homepage to log time and create CV tasks.
Tap on the ![]() icon on Top Right corner of the interface.
icon on Top Right corner of the interface.
Enter “Assigned To” and the Necessary details.
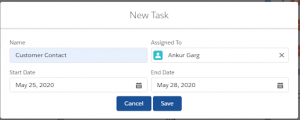
Click Save
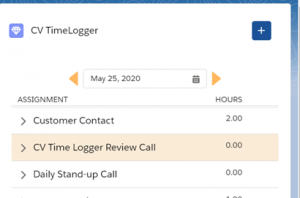
New CV Task will get highlighted on the interface of the assigned user. CV task will be available for all the Date from Start Date to End Date of the Assigned CV task.
Alternatively:
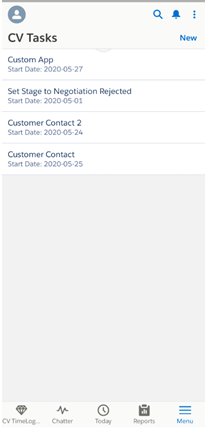
You can click on the CV tasks Tab from your CV TimeLogger App. Click on the New button to create a CV task.

Enter Assigned To and the necessary details.
Click Save.

You can use a list view to see all the CV tasks created or Assigned.

Visit here from Salesforce help & Training for more information on List views.
Log CV Time Entries
CV Time Tracking interface quickly shows all your assigned CV tasks for any specific date with calendar option and manual navigation. It allows you to enter your hours and view logged CV Time Entries.
- Access the CV TimeLogger App by click on app launcher and search for the CV TimeLogger app.
- Click on CVTimeLogger to open the app
- You will see the Time Tracking component on the homepage to log time and create CV tasks.
- You can Select the Date using calendar view or use prev. and the next arrow to navigate to the required date.
- Click on Assigned CV task to open the option to add or update the CV time entry.
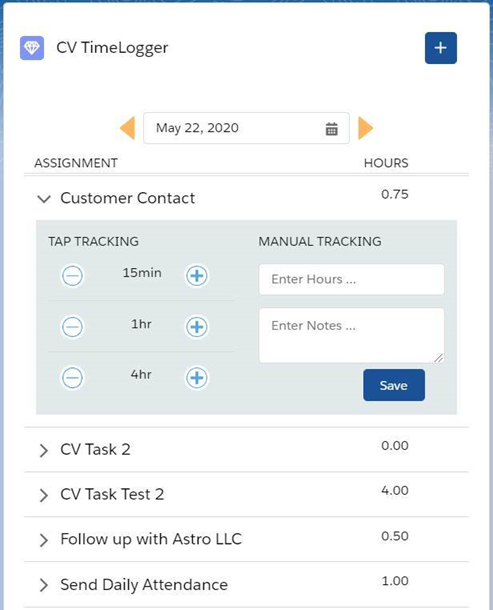
- Use the Tap Tracking feature to click on + or – button to add time in intervals of 15min, 1hr and 4hr.
- With Manual Tracking, you can type Hours and add Notes for your time entries.
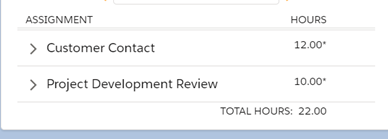
- For the Unsaved CV time entry asterisk (*) will appear next to the logged Hours value.
- Click Save to log the CV time entry for the given date. Now the asterisk (*) will disappear from that CV task. It is easy to identify the unsaved CV time entry with this interface.
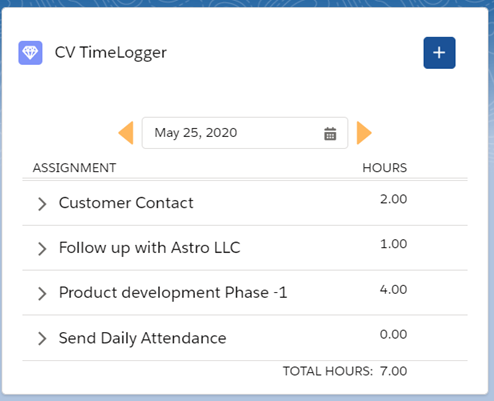
View Hours entered for individual Assignment and as well as Total Hours entered for that day.
Key Points:
- CV task will appear in the interface if the “Assigned To” is equal to log in User and the Date selected on the interface is between Start and End date of CV Tasks.
- If you refresh or load the page, then the interface will show already logged CV Time Entries with Hours and Notes.
- You can create only a single CV Time Entry in a Day for any Assigned CV Task. This framework is easy to manage your time.
- Existing CV time entry will get updated if you make any changes in Hours or Enter Notes for the logged CV Time Entry for that Task in a Day.
CV TimeLogger Mobile App Setup
With CV TimeLogger you can track CV time entries on your salesforce mobile app in a very efficient manner.
From Setup, Enter Navigation into Quick Find search box and click on Salesforce Navigation
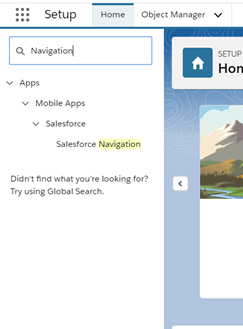
From the list of available components on the left, select CV TimeLogger Mobile, then click Add.
Once complete, click Save.
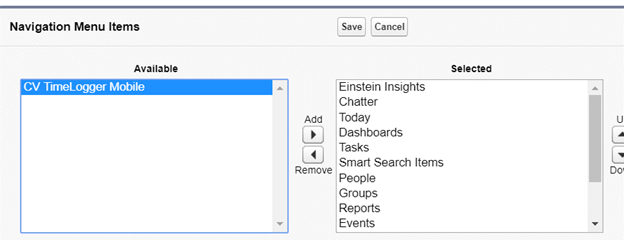
The app is ready to use on Mobile to log hours with an interactive interface.
Use CV TimeLogger on Mobile App
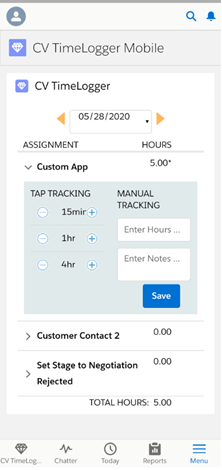
Once Mobile setup steps are completed you can easily use the CV TimeLogger interface to create and update CV time entries.You can view all your assigned CV Tasks and logged hours in this interface between the start and end date of your assigned CV tasks.
Use + or – button on Tap tracking to log hours or click on Enter Hours box to enter the hours manually and click on save.
How to Navigate
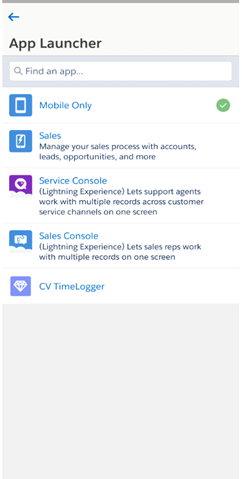
Click on Menu option and select CV TimeLogger Mobile as shown. If you have another version of the app and it is not available, then click on the Menu Button and click App launcher.
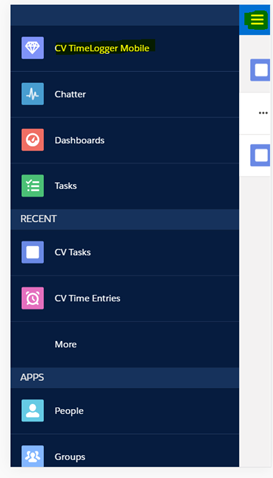
You will have a seamless experience of CV TimeLogger application with the same interface as that of desktop in Mobile.
To access Reports, Dashboard, or to create New CV Tasks. Click on the CV TimeLogger tab from App launcher.
Click on CV Tasks to view recent CV Tasks or to create new CV tasks for your team or yourself. Click on the New button and enter the necessary details on the page and click save.
Click on Reports, Dashboard tab from CV TimeLogger to access “out of box” analytics.
CV TimeLogger comes with pre-built out of the box reports and dashboard that are helpful to visualize the date in an efficient way. Managers can view reports on the CV tasks and logged hours by resources. There are Monthly reports that will show hours logged by each resource as well. It saves your time and gives better analytics of the CV Tasks assigned.
Access CV TimeLogger app by click on app launcher and search for CV TimeLogger app.
Click on CV TimeLogger to open the app.
Click on the Reports Tab to access all the Reports.
By default it will show Recent Report. Navigate to All folder to access the Report folders
We have given two pre-built folders to categorize the report.
- CV TimeLogger Resource Reports
- CV TimeLogger Manager Reports
Click on folder to view all the reports in that folder
Click to open any report to access the data and charts.
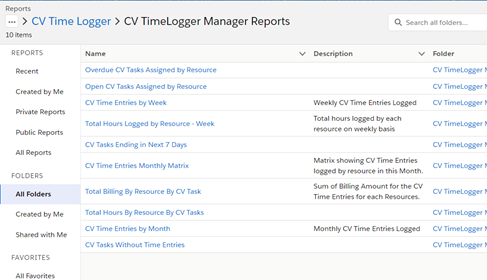
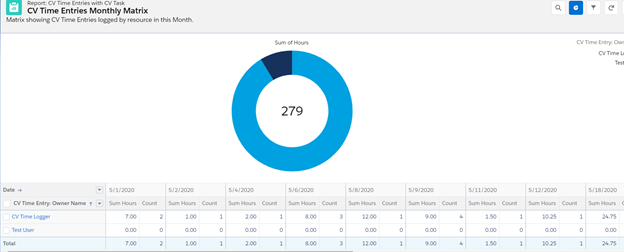
Example: CV Time Entries Monthly Matrix
This report will give you a matrix for this month CV time Entries logged by each Resource and with a report chart you can easily visualize the Total hours logged by resource and manage resources accordingly.
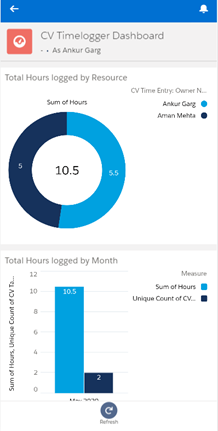
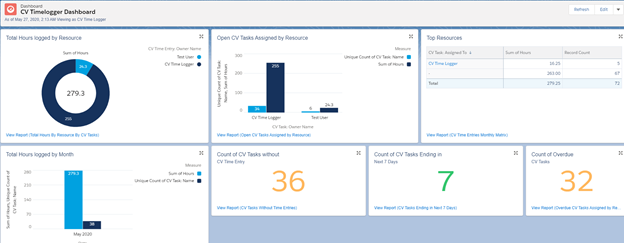
Dashboard
We also have an “out of the box” Dashboard which gives an overview of all the CV tasks and CV Time entries currently logged in your system. This dashboard is designed from the Management perspective to save their time and manage their resources in an efficient way.
Click on Dashboard Tab in the CV TimeLogger App Navigation bar.

Go to All Folder and click to open CV TimeLogger Dashboard Folder to access the dashboard.
Click on “CV TimeLogger Dashboard” and it will be ready to use.
If you don’t see these reports and dashboard folder. Please ask your system admin to provide you access using steps mentioned below.
Give access to Reports and dashboard Folder
CV TimeLogger app comes with “out of the box” analytics which can be accessed using reports and dashboard tabs and follow the steps given above. By default only System admin will have access to manage reports and dashboard.
You can give access to your Managers, Team members or any user of these pre-built analytics comes with the CV TimeLogger app.
We have two Report Folders;
- CV TimeLogger Manager Reports : This folder have all the reports from Management perspective with data related to all the CV tasks and CV time entries
- CV TimeLogger Resource Reports : This folder has reports related to Individual resources to view their own CV Tasks and CV time entries.
Dashboard Folder
CV TimeLogger Dashboard Folder : This folder has a dashboard for the Management perspective to visualize the date for their resources.
We recommend reviewing these reports/dashboards before giving access to any user within your organisation so that they have access to relevant analytics.
Navigate to the App launcher and click on CV TimeLogger app.
Click on Reports Tab or Dashboards Tab and Go to All Folders.
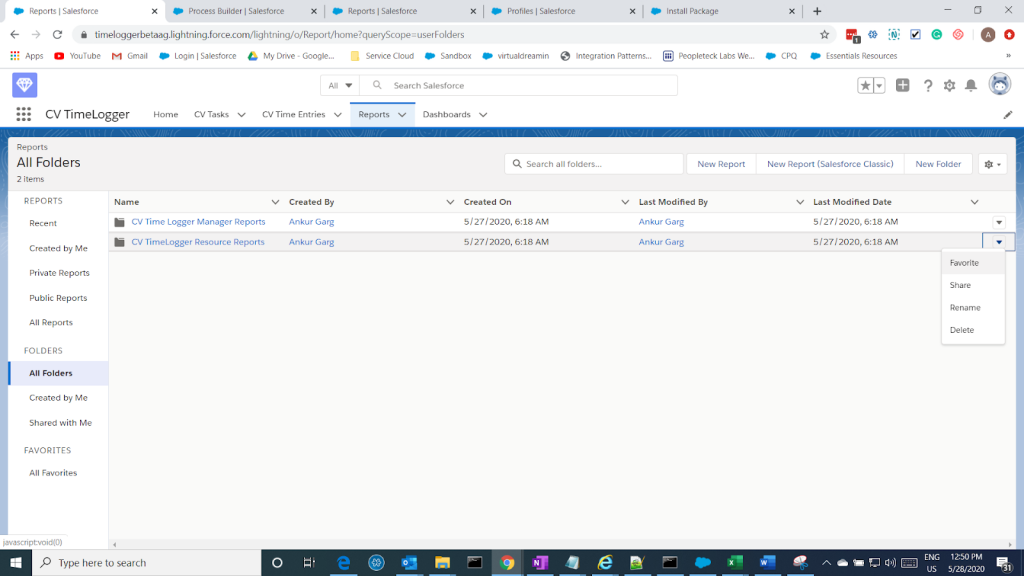
Click on the Down arrow at most right of the folder for which you need to give access and click on share.
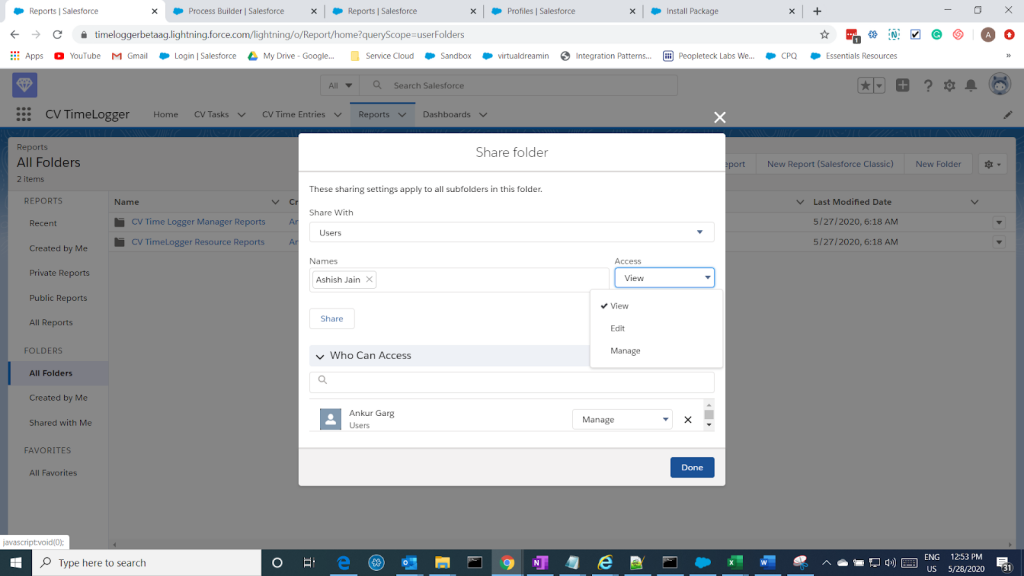
Enter Names of the User to whom you want to give access. You can enter multiple names. Select Access from dropdown.
Click Share. You will see the names appear in the below section. Once confirmed.
Click on Done.
If you need more information on accessibility and to review which access would be suitable for your users.
Visit salesforce help and training Folder Access.
You can also edit these reports or create your own report using CV Tasks and CV Time Entries.
To get more details on how to Build or Customize reports and dashboards in salesforce lightning. visit salesforce help and training Reports and Dashboards.
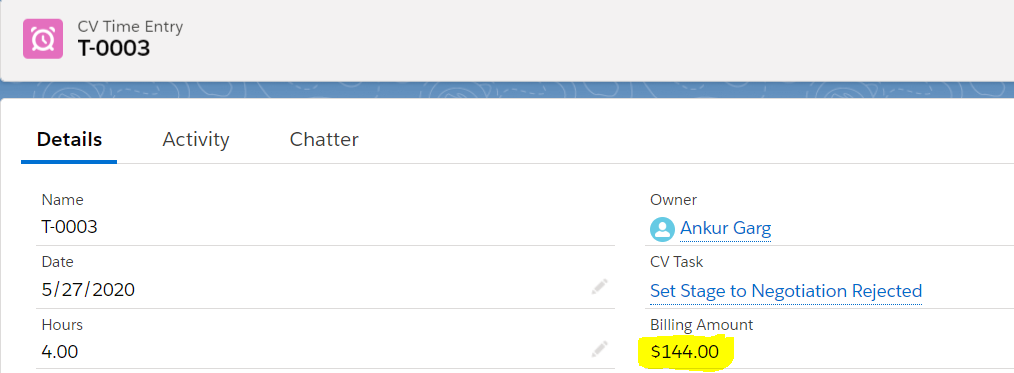
With CV TimeLogger app you can also track the Rate/Hr for your user and pre-built calculation will give you biling amount of each time entry your resources logged using this app.
We recommend not to give access to these critical fields to all the users and keep it with the admin or the managers.
Add Rate/Hr field on User record
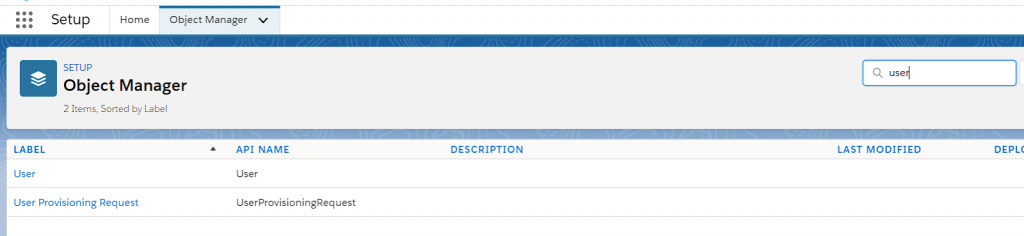
From setup, Click on Object Manager.
Enter User in Quick find search and Click on User.
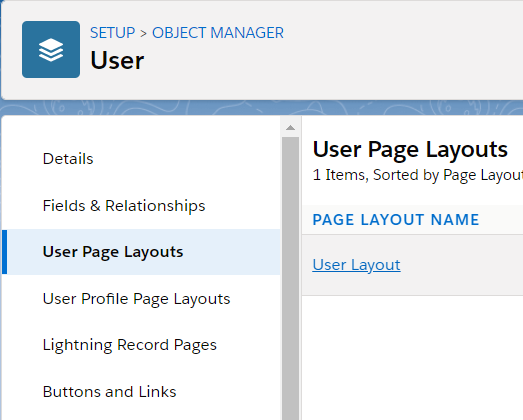
Click on User Page Layouts from the left panel and click on User layout to Edit.
Drag Rate/Hr field from the Fields section on the Top and drop to the page layout as desired.
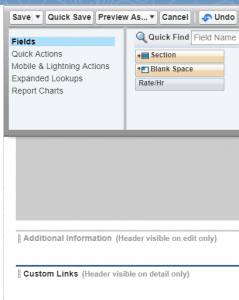
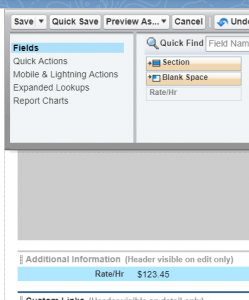
Click Save.
Remove/Add Access of Rate/Hr field
By default if you install an app for all the users then this field will be accessible for everyone once you add it to layout. To remove access.
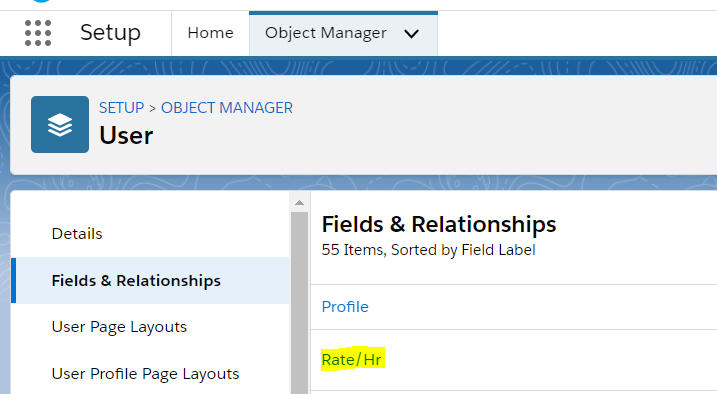
Go to Object Manager from Setup.
Enter User in Quick find search and Click on User.
Click on Field and Relationship
Scroll for Rate/Hr and Click on field to Edit.
Click on Set Field-Level Security button.
Uncheck Visible checkbox next to Profile for which you need to remove access.
Click Save.

Now users with that Profile will no longer view and edit this field.Only user with Visible checked have access to this field
Remove/Add Access of Billing Amount Field
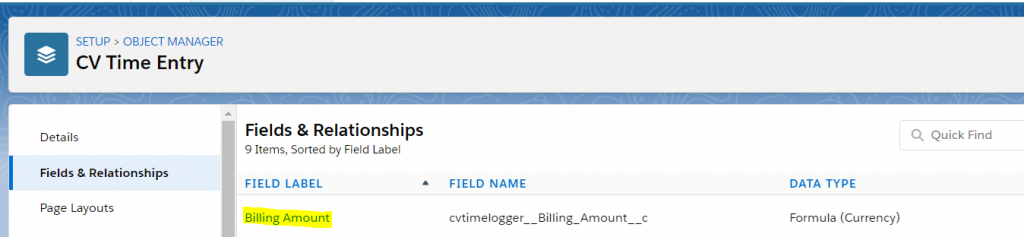
Go to Object Manager from Setup.
Enter CV Time Entry in Quick find search and Click on CV Time Entry.
Click on Field and Relationship.
Scroll for Billing Amount and Click on field to Edit.
Click on Set Field-Level Security button.
Uncheck Visible checkbox next to Profile for which you need to remove access.
Click Save.
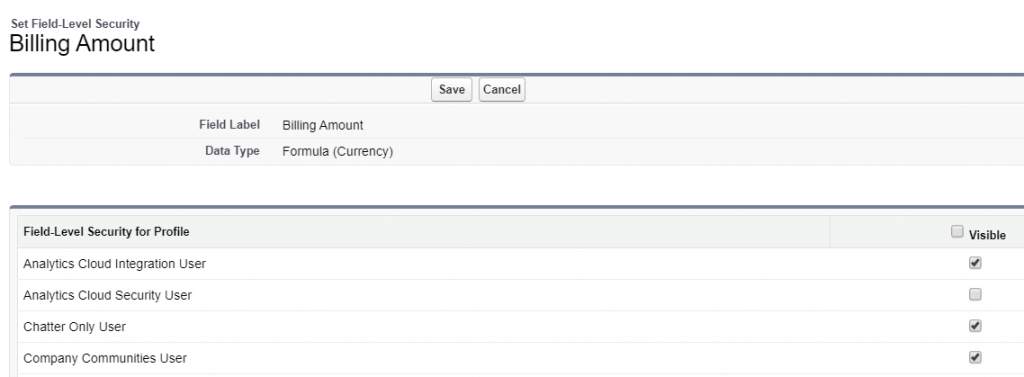
Now users with that Profile will no longer view this field. Only users with Visible checked for their profile have access to this field.
Enter Value for Rate/Hr for Users
From Setup, Enter Users in the quick find search and click on users.
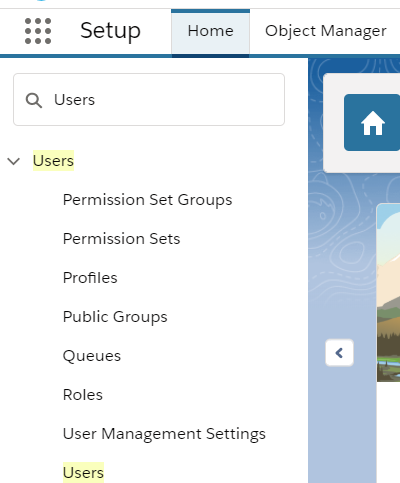
Click Edit for the user you want to enter Rate/hr Value. Scroll down for field Rate/Hr and Enter value.
Click Save.
App is ready to use this value on CV Time Entries for Billing Amount Calculations.
Set Private Data Model and Role Hierarchy
With a private data model and role hierarchy you have more control and flexibility on CV Tasks and CV Time Entries created with the CV TimeLogger. Users will Only have access to the CV Tasks that are assigned to them and Managers have the flexibility to view all the CV Tasks for their subordinates. As an Admin you can setup this very easily.
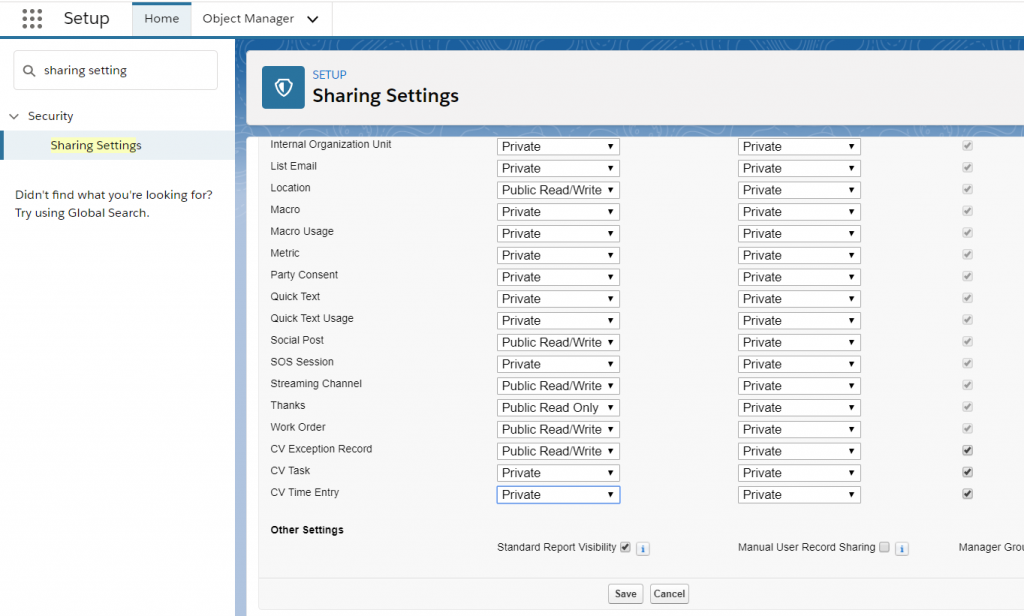
Setup Organization-Wide Defaults
From Setup, Enter Sharing Setting in Quick find search.
Click on the Sharing Settings.
Click to Edit “Organization-Wide Defaults”
Select Private in Dropdown fro Cv Tasks and CV Time Entry
Keep Checkbox Checked.
Click Save.
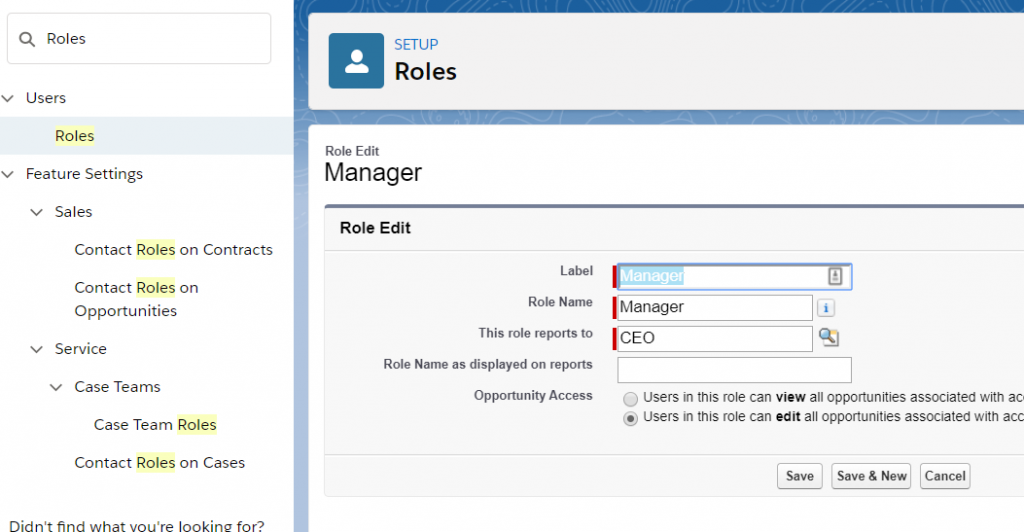
Setup Roles
From Setup, Enter “Roles” On the Quick find box
Click “Roles”
Click on “Set Up Roles”
Click “Expand All”
Under the Role you prefer, click on “Add Role”
Fill up the Label, Role Name ( e.g. Tech Lead) and select a Parent Role( e.g. Delivery manager) which this Role will report.
Enter a Role name that will be displayed on Reports
Click on “Save & New”
You can visit this link for more information: Guideline for Role Hierarchy.
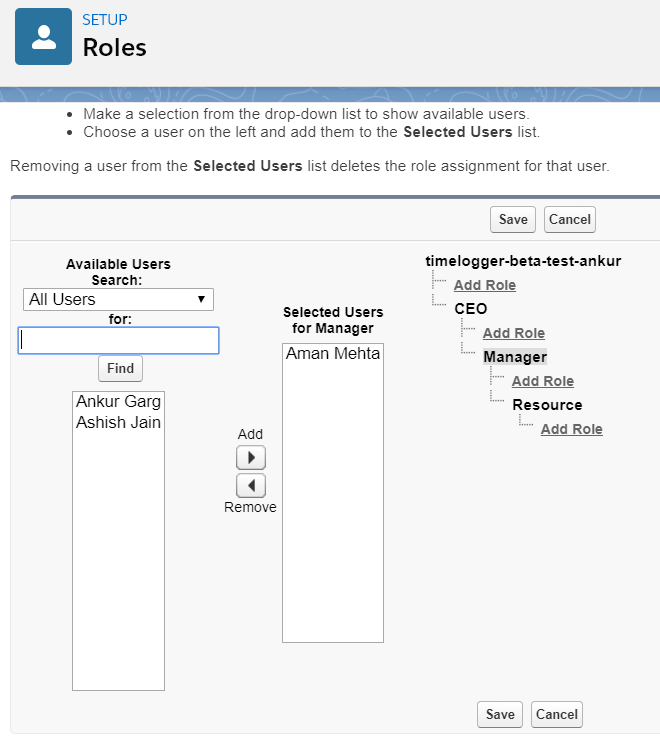
Assign users to Role
From Setup, enter Roles in the Quick Find box, then select Roles.
Click Assign next to the name of the desired role.
NOTE: You can also access this page by clicking Assign Users to Role from the Users in Role related list.
Make a selection from the drop-down list to show the available users.
Select a user on the left, and click Add to assign the user to this role.
Click Save.
For more information on this setup at you can visit Trailhead Module